Magnetic Levitation
Levitation
- Introduction
- Why
- Other Maglev
- Hard Drive Maglev
- Schematic
- Parts List
- Buying Parts
- Woodworking
- Other's
- Photographs
- Infrared Emitter
- Photodetector
- Reference Det
- Difference Amp
- Feedback Loop
- Loop Equations
- Bode Plot
- Phase Lead
- Output Amp
- Coil Driver
- PWM
- Lifting Coil
- PSPICE
- Build Time
- PCB
- Power Supplies
- Setup
- Test Power
- Test IR Emitter
- Test Signal Det
- Test Ref Det
- Adjust Sensing Res
- Test Diff Amp
- Test Non-Invert Amp
- Test Coil Driver
- Test Lifting Coil
- Results
Testing the Signal Detector
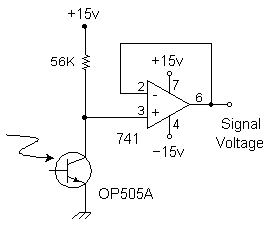
The signal detector circuit looks at the tip of the lifting coil. It detects whether an object is there or not. Obviously, if if this fails then nothing will work. How do you verify it's working?
To review the signal detector circuit go here.
By the way, the signal detector circuit is identical to the reference detector cicuit. The main difference is the physical location of the optodetectors. So almost everything mentioned here applies equally well to both circuits.
Note you can't accurately measure the voltage on the 56k sensing resistor because the internal resistance of most voltmeters is less than 56k. That's why the first two 741 voltage followers are there in the first place.
Fairly Obvious Things to Check
 Here are
some things to look at before getting too serious with the voltmeter.
Here are
some things to look at before getting too serious with the voltmeter.
- Is the op-amp the right way around? The 'dip' in a corner is important! It is a marker to indicate pin 1. Looking at the top, say after it's plugged into the breadboard, the pins are numbered 1 - 8 in a counter-clockwise fashion. They use two different ways to indicate the end with pin 1. Usually it's a small circular depression on the top, next to pin 1 itself. Or, it's a notch on the top at the end with pin 1.
- Did you connect both op-amp power pins? Make sure pin 7 goes to +15v and pin 4 has -15v. My big schematic implies the connection but doesn't show it.
- Is the phototransistor connected with the right polarity? If you always measure 0 volts across the sensing resistor, then it may be in backwards. Like most BJT devices (bipolar junction transistor) it can only conduct one direction. Just swap the wires and try again; it will not be damaged if you put it in backwards.
- Does the optodetector match the LED emitter? It would be nice to get a matched pair, just so you know the detector is looking at the same frequency that the emitter puts out. This does not seem to be critical (I think) because I heard they're fairly broadband. The easiest way to ensure compatibility is to visit Radio Shack. They sell a package containing both. Buy two packages because you need two detectors, then save the extra emitter as a spare.
- Try to adjust the LED emitter so an equal amount of light falls on both detectors.
- Secure the optodetector firmly in place. Small movements will affect its sensitivity.
Testing Voltage Levels
Use these voltage and current measurements to check the signal detector's operation.
- Does the output pin 6 show a negative voltage? This should not happen, because the op-amp is a voltage follower, and its input must be between 0 and +15 volts. Here are things to look for.
- Cover the phototransistor lens with something (such as your thumb) and measuring the voltage
on its 56k resistor.
- One lead of 56k resistor should measure +15v, and the other should measure at least +5v or above. You might measure as much as +15v on both leads.
- The 56k resistor goes to pin 3 on the op-amp, so measure the voltage there also. It should be the same, somewhere between +5 and +15v while the phototransistor is covered up.
- Measure the power pins on the op amp. Pin 7 should be +15v, and pin 4 should be -15v.
- Measure the voltage on pin 2 and pin 6 of the op-amp, they should be the same. (This is testing the jumper wire connection from pin 2 to pin 6.)
- If all these measurements check out okay, and pin 6 is still negative, then maybe the op-amp died. Try swapping it with another op-amp on the breadboard and pray to the silicon gods and test these things again. If all this finds a problem, and you fix some error somewhere, then pin 6 should start registering a positive voltage. When the phototransistor is covered, it should be near +15v. When the phototransistor is uncovered, it should become a lower voltage.
- Make mechanical adjustments (rotating or tilting slightly the emitter and detector) to get the lowest voltage on pin 6 in both of the first two stages. The 'lowest voltage' corresponds to the most optical signal falling on the phototransistors.
- A dark phototransistor should result in pin 6 of its op amp being about the +power supply voltage.
- Conversely, a brightly lit phototransistor should result in pin 6 of its op amp going to a lower voltage, maybe down to 6 or 9 volts or something. It depends on brightness of the LED, the sensitivity of the detector, and the distance between the two.
- Use the hand-waving to create the bright and dark situations. Measure the voltage on pin 6 of the op amps. Record the highest and lowest voltages you get on pin 6.
- Is the highest voltage more than two volts above the lowest voltage? Is so, this is great, it's working!
- About the mechanical adjustments... The idea is to get the phototransistor pointed toward the emitter correctly. I hope you can use the voltage on pin 6 of those two voltage followers to check the success of the alignment. (Hint: higher voltage means more dark, lower voltage means more bright.)
- Still doesn't work right? The phototransistors may still be wired backwards. This can happen if the data sheet diagram is a top view, and you thought it was a bottom view. Or versa vice. (That's 'vice versa' vice versa.)
| < Previous | Page 30 of 37 | Next > |
©1998-2026 Barry Hansen