Magnetic Levitation
Levitation
- Introduction
- Why
- Other Maglev
- Hard Drive Maglev
- Schematic
- Parts List
- Buying Parts
- Woodworking
- Other's
- Photographs
- Infrared Emitter
- Photodetector
- Reference Det
- Difference Amp
- Feedback Loop
- Loop Equations
- Bode Plot
- Phase Lead
- Output Amp
- Coil Driver
- PWM
- Lifting Coil
- PSPICE
- Build Time
- PCB
- Power Supplies
- Setup
- Test Power
- Test IR Emitter
- Test Signal Det
- Test Ref Det
- Adjust Sensing Res
- Test Diff Amp
- Test Non-Invert Amp
- Test Coil Driver
- Test Lifting Coil
- Results
Levitator Simulation Using PSPICE
What if you wanted to analyze this circuit using engineering CAD (computer aided design) tools?
Many engineering students and some working engineers have access to PSPICE and other commercial tools. You can gather a great deal of insight into this circuit, and easily experiment with changes.
I am using Allegro Design Entry CIS v10.3.0.p001, produced by Cadence Design Systems. This tool integrates schematic capture with PSPICE simulation and other tools. I provide all my files, in the hope you can use them to do your own analysis.
Levitator Package Download
Download levitator package here
Although my package was produced by Allegro tools, the netlist and PSPICE files are text-based industry standard format. You can import selected files into many other implementations of PSPICE.
Please note the inputs to U3 are swapped, so it becomes a non-inverting amplifier. This makes the graphs more natural and a bit easier to read since they're right-side-up. It is not a problem during analysis because the Signal and Reference points are symmetric. However, it is a departure from the real-world schematic and, if you closed the loop in PSPICE, it would not function properly.
DC Operating Point
All stages are dc-coupled. This is required for any controller that must govern the absolute position of an object in space. So it is useful to know the default operating point of every node. This analysis also tells you the maximum coil current and power dissipation in various components. The result of the bias point calculation from Allegro is:

- The "input signal" is chosen to fully turn on the coil driver.
- We simplify some parts for convenience. The op amps use an "ideal model" rather than LM741.
- The optical detectors are a non-standard part, so we use a simple resistor with the equivalent current.
- Since the tools assume ideal inductors have zero resistance, a 7-ohm resistor is added in series.
- For purposes of dc bias, inductors are shorts and capacitors are open.
- The power supply delivers 2.1A at 15v, or almost 32 watts.
Let's look at the stages one by one, calculate the gain, and compare them to the original design.
DC Sweep: Gain of Difference Amplifier
If we connect a small dc voltage source to the input signal's resistor divider, then we can examine the circuit behavior over the entire operating range. This is called a dc sweep.
The results from Allegro to compare the difference amplifier (U3) to input voltage (Vx):
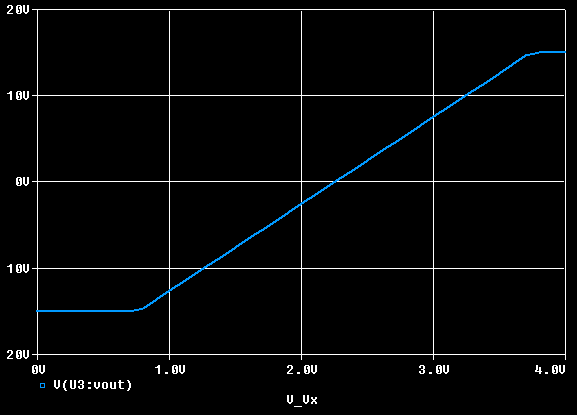
From the linear data points above (and using the waveform cursor), we can calculate the first
stage gain:
Gain = [12.591 - (-12.636)] / (3.5 - 1.0) = 10.0976
This is a bit higher than calculated gain of 9, but it seems reasonable.
DC Sweep: Gain of Phase Lead Network
Now let's see the gain (attentuation) introduced by the phase lead network. We can use the same Vx input voltage, and study the signal strength at the junction of R7 and R8:
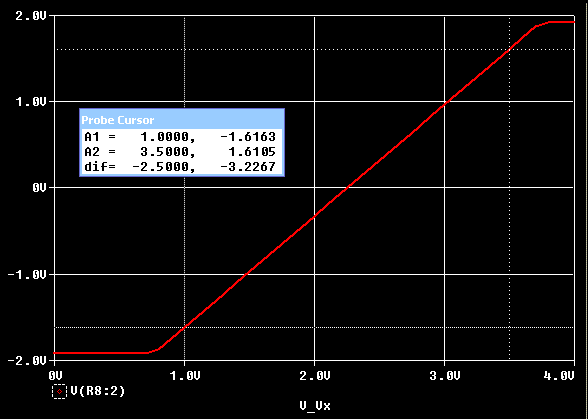
The total gain after the phase lead network is Gain = 3.2267 / 2.5 = 1.291. We can isolate the
gain (attentuation) of the phase lead network by dividing by the first stage's gain, which yields:
Gain (phase lead) = 0.1278
This is a good match with the calculated gain of 0.128.
DC Sweep: Gain of Output Amplifier
In a similar fashion, we can use the "dc sweep" function for the output stage gain
alone:
Gain (output amp) = 232.38
This is a good match with the calculated gain of 247.
DC Sweep: Coil Current versus Sensor Voltage
Now that we've seen all the individual stages, let's see how the coil current depends on the sensor voltage. This is an excellent "paper test" of the overall dc-coupled design. This also provides the end-to-end gain figure, which might be useful for analyzing the closed-loop control circuit.
The results from Allegro for coil current versus input sensor voltage:
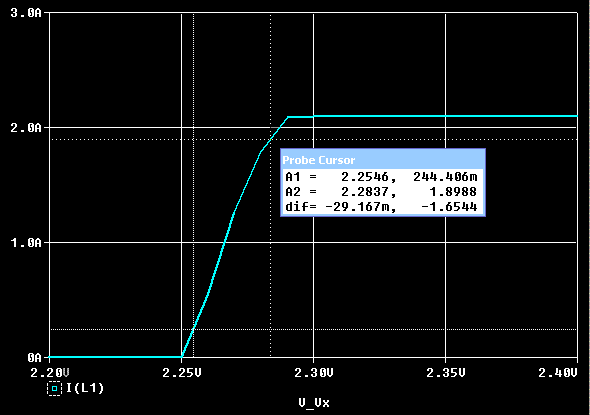
- The coil current switches from 'off' to 'on' over a narrow range of input signal.
- The 'operating range' is from 2.25v to 2.2905v, or about 40mv.
- Your actual operating range will vary according to the reference voltage.
- The maximum coil current is 2.1 amps (same as the bias point computation).
- Gain = 56.72 amps / volt
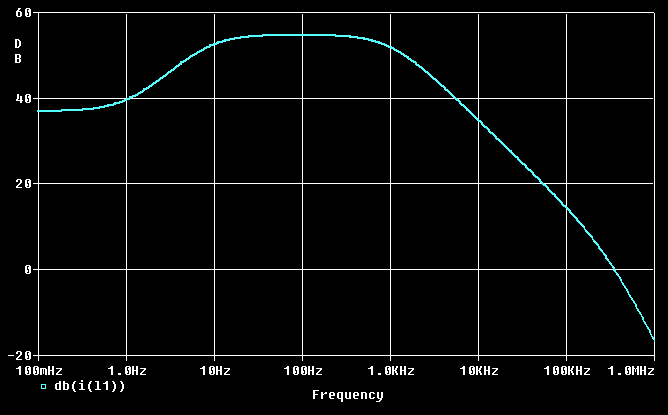
AC Frequency Response
We will set up the AC sweep for the levitator, to get the phase and magnitude of sinusoidal waveforms over a range of frequencies. This will tell us the coil current's frequency response.
We do this by replacing Vx (dc power) with VAC for a small-signal sweep. The tools calculate the bias point, and the AC sweep is performed on a linearized model. This approach can only be used to find the small-signal gain and frequency response. Items such as voltage swing, clipping, and saturation must be obtained from the transient simulation, or by using the operating point information.
The Bode plot of small signal gain is:
| < Previous | Page 23 of 37 | Next > |
©1998-2026 Barry Hansen