Magnetic Levitation
Levitation
- Introduction
- Why
- Other Maglev
- Hard Drive Maglev
- Schematic
- Parts List
- Buying Parts
- Woodworking
- Other's
- Photographs
- Infrared Emitter
- Photodetector
- Reference Det
- Difference Amp
- Feedback Loop
- Loop Equations
- Bode Plot
- Phase Lead
- Output Amp
- Coil Driver
- PWM
- Lifting Coil
- PSPICE
- Build Time
- PCB
- Power Supplies
- Setup
- Test Power
- Test IR Emitter
- Test Signal Det
- Test Ref Det
- Adjust Sensing Res
- Test Diff Amp
- Test Non-Invert Amp
- Test Coil Driver
- Test Lifting Coil
- Results
Designing the Lifting Coil
How do you design a coil for lifting a steel ball? There's no clear design rules, but I can offer tips and suggestions!
Do you have suggestions of your own? Please e-mail your ideas to me. I'll update this page with whatever I get. Thanks!
Hints for a Lifting Coil
You need to produce a magnetic field which primarily extends downward from the lifting coil. So consider these ideas.
- Short and fat coils are better than long and skinny. They reduce the leakage flux that would otherwise escape outward from the sides.
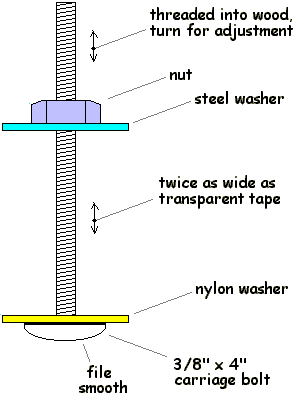
- An iron hat (such as a flatwasher) on the top is a good idea. It helps hold windings in place, and helps magnetic flux spread out from the top.
- A nylon washer on the bottom (or other non-ferrous washer) is a good idea. It helps hold the windings onto a fat coil, without shielding any magnetic flux from going downwards.
- An iron core will greatly increase the coil's strength.
- Put the coil itself as low as possible. Closer to the ball is better.
- You need to be able to adjust the coil's position. (Or the detector's position.) The usable magnetic effect extends for only about a centimeter or so, so adjustability is important.
- Don't make the coil windings more than two inches thick. It won't have enough surface area to remain cool, and will overheat.
- A coil resistance of 5 - 50 ohms driven with up to 2 amps has worked well. A couple of published designs operate in this range, so this would be a good target to shoot for.
- Wind some tape around the bolt before winding the coil. This keeps the threads from cutting the insulation.
Coil Core
You can wind a coil on a carriage bolt. (Use one layer of tape first to protect the wire.) The threads can provide adjustability by screwing it in (or out) of your wooden frame.
 The
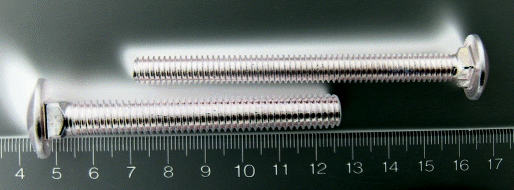
size of the carriage bolt is not critical. I used a common carriage bolt 4 inches long and 3/8
inches thick, chosen merely for convenience. Click on the photo at left to see two examples.
The
size of the carriage bolt is not critical. I used a common carriage bolt 4 inches long and 3/8
inches thick, chosen merely for convenience. Click on the photo at left to see two examples.
The bottom of your steel core (coil form) should taper to a point. This gives a point source of flux going downward. I found a flat-bottomed steel core gave too many places for the ball to attach itself to, and allowed too much side-to-side motion.
File off any roughness to ensure the bottom of your steel core is pointy and smooth.
A Coil That Works
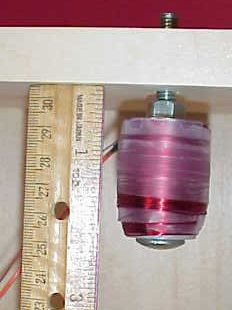
 Here's the coil I used. Click on the picture at left for a full size image. It shows a closeup of how
it is screwed into the wooden frame above it. The whole bolt/coil assembly can be turned to raise
and lower it. You can see a nut which fastens the top washer in place. This also helps eliminate
vibration and hum.
Here's the coil I used. Click on the picture at left for a full size image. It shows a closeup of how
it is screwed into the wooden frame above it. The whole bolt/coil assembly can be turned to raise
and lower it. You can see a nut which fastens the top washer in place. This also helps eliminate
vibration and hum.
I used 24-ga magnet wire, in 1341 turns on 24 layers wound on a carriage bolt. There is a nylon flatwasher on the bottom (the head end) and a common galvanized steel flatwasher on the top. The coil length is twice the width of Scotch magic transparent tape, which secures the layers of windings. The coil dimensions are:
- 7 mm inside diameter (same as bolt diameter)
- 33 mm outside diameter
- 40 mm winding length along bolt
- 0.54 mm wire diameter (i.e. 24-gauge wire)
This coil has 7.0 ohms of resistance. Driven by a 15v source, it carries about 2 amps of current. Unfortunately it tends to get pretty warm, if left full on for ten minutes. However, testing has found it works fine left on overnight holding up a small bolt. But I am still concerned about how hot it may get if left on without an object under it.
The coil is energized by a 2N3055 pnp power transistor on a heat sink. The heat sink doesn't seem to be required, but keep an eye on it! Some other people have reported they just put it into the breadboard without any heat sink. But two people said the transistor ran boiling hot, even with a heat sink (but they had a transistor bias problem).
| < Previous | Page 22 of 37 | Next > |
©1998-2026 Barry Hansen